Chapter 2 Client-Side Development
This chapter provides an overview of the context for doing client-side web development: a brief introduction to how the internet works and where client-side programming fits in with that. It provides background that will be useful in learning specific web technologies.
2.1 Clients and Servers
Web development is the process of implementing (programming) web sites and applications that users can access over the Internet. However, the Internet is a network involving many different computers all communicating with one another. These computers can be roughly divided into two different groups: servers store (“host”) content and provide (“serve”) it to other computers, while clients request that content from the servers and then present it to the human users. Generally, servers are the computers owned and managed by large organizations, while clients are individual devices (laptops, phones, etc) owned by individual users.
How do clients and servers interact? Well consider the process of viewing a basic web page, such as the Wikipedia entry on Informatics. In order to visit this page, the user types the web address (https://en.wikipedia.org/wiki/Informatics) into the address bar, or clicks on a link to go to the page. In either case, the user’s computer is the client, and their browser takes that address or link and uses it to create an HTTP Request—a request for data sent following the HyperText Transfer Protocol. This request is like a letter asking for information, and is sent to a different computer: the web server that contains that information.
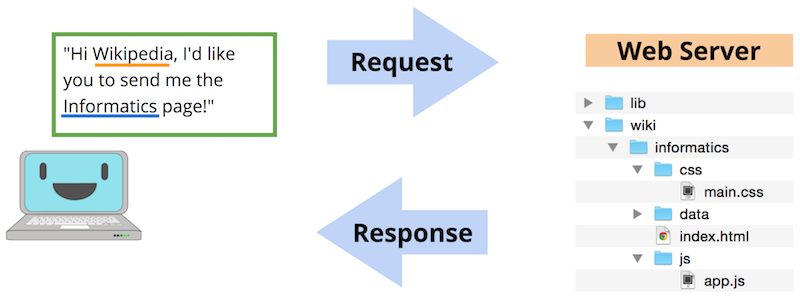
A diagram of client/server communication.
The web server will receive this request, and based on the request’s content (including the details of the web address) will decide what information to send as a response to the client. In general, this response will be made up of lots of different files: the text content of the web page, styling information (font, color) for how it should look, instructions for responding to user interaction (button clicks), images or other assets to show, and so forth.
The client’s web browser will then take all of these different files in the response and use them to render (create/present) the web page for the user to see: it will determine what text to show, what font and color to make that text, where to put the images, and is ready to do something else when the user clicks on one of those images. Indeed, at its most basic a web browser is just a computer program that does two things: (1) sends HTTP requests on behalf of the user, and (2) renders the resulting response from the server.
Given this interaction, client-side web development involves implementing programs (writing code) that are interpreted by the browser, and are executed by the client. It is the process of authoring the code that is sent in the server’s response. This code specifies how websites should appear and how the user should interact with them. On the other hand, server-side web development involves implementing programs that the server uses to determine which client-side code is delivered. As an example, a server-side program contains the logic to determine which cat picture should be sent along with the request, while a client-side program contains the logic about where and how that picture should appear on the page.
This course focuses on client-side web development, or developing programs that are executed by the browser (generally as a response to a web server request). While it will cover how client-side programs can interact with a server, many of the concepts discussed here can also be run inside a browser without relying on an external server (called “running locally”, since the code is run on the “local” machine without going outside to a server).
2.2 URLs and Web Files
Whether the user types an address into the browser’s address bar or clicks on a link (which just navigates to a different address), the server determines which content to send to the browser to render based on the URL in the address bar. The URL (Uniform Resource Locator) is a lot like the address on a postal letter sent within a large organization such as a university: you indicate the business address as well as the department and the person, and will get a different response (and different data) from Alice in Accounting than from Sally in Sales. The URL acts as an identifier (think: variable name) for the page you want to see, while the page or data you want to access is the resource that is being identified/located. Inded, more properly URLs are a specialized form of URI (Uniform Resource Identifier), though the two terms are often used interchangeably.
Like postal letter addresses, URLs have a very specific format used to direct the request to the right resource.

Diagram of the format (schema) of a URL.
A URL is generally made up of the following parts (though not all need to be included):
scheme(alsoprotocol): the “language” that the computer will use to send the request for the resource (file). In the web, this is commonlyhttp(using the HyperText Transfer protocol). But better practice is to instead usehttps(secure HTTP), which encrypts the communication. Don’t use insecurehttp!Other protocols exist as well. If you double-click on a web file from your local computer, it will open that file with the
fileprotocol, meaning that the computer is accessing the resource from the file system.Web page hyperlinks often include URIs with the
mailtoprotocol for email links, or thetelprotocol for phone numbers.When working with web systems, you may also encounter
ftp(File Transfer Protocol) addresses, which are used when uploading files to some webhosts. When usinggit, you may encounterssh(Secure Shell protocol) addressess. And there are many more network protocols as well, though in the web we’ll usually just usehttps.domain(alsohost): the address of the web server to request information from. You can think of this as the recipient of the request letter. These are.comaddresses you usually think of with a web site, such asgoogle.comorischool.uw.edu.(The
wwwis often not necessary; it indicates that the address is a web address, as opposed to anftpaddress, and most servers will treat anyhttpsrequest as going to a web address). It’s also possible to write the domain in a URL using an IP address, though that isn’t common in web programming.The host can include multiple subdomains, which are written before each
.. Soischool.uw.edurefers to theischoolsubdomain of theuw.edudomain.The
localhostdomain (IP127.0.0.1) is a special domain name that refers to the address of the current computer; you will use this when accessing pages on local development servers.port(optional): used to determine where to connect to the web server. By default, web requests use port80, but some web servers accept connections on other ports—e.g.,8080,8000and3000are all common on development servers, described below.path: which resource on that web server you wish to access. For many web servers, you can think of this as the relative path to the file starting from the “root” folder of that server (which may not be the computer’s root folder). Thus in the above diagram the path/example/info/page.htmlcan be understand as referring to thepage.htmlfile in theinfofolder in theexamplefolder inside the root of the server.If you specify a path to a folder rather than a file (including
/as the “root” folder), most web servers will serve the file namedindex.htmlfrom that folder (i.e., the path “defaults” toindex.html). Sohttps://google.comactually is the same ashttps://google.com/index.html. As such,index.htmlis the traditional name for the file containing a website’s home page.While the path can be best understood as being a file path, it doesn’t necessarily correspond to a server’s file structure—indeed later in the course you will learn to specify routes for the path that don’t reflect files at all!
As in any computer program, you should always use relative paths in web programming, and these paths are frequently (but not always!) relative to the web server’s root folder.query(optional): extra parameters (arguments) included in the request about what resource to access. The leading?is part of the query, followed by key-value pairs of parameters separated by&symbols. These are commonly used when including things like “search queries” when using a search engine.fragment(optional): indicates which part (“fragment”) of the resource to access. This is used for example to let the user “jump” to the middle of a web page. The leading#is part of the fragment.
Client-Side File Types
It is the web browser’s job to interpret and render the source code files sent by a server as part of an HTTP response. As a client-side web programmer, your task is to write this source code for the browser to interpret. There are multiple different types of source code files, including:
.htmlfiles containing code written in HTML (HyperText Markup Language). This code will specify the textual and semantic content of the web page. See the chapter HTML Fundamentals for details on HTML. Note that opening one of these files through your file system (e.g., by double-clicking on it) will open that the web page it represents in a browser..cssfiles containing code written in CSS (Cascading Style Sheets). This code is used to specify styling and visual appearance properties (e.g., color and font) for the HTML content. See the chapter CSS Fundamentals for details on CSS..jsfiles containing code written in JavaScript. This code is used to specify interactive behaviors that the website will perform—for example, what should change when the user clicks a button. Note that JavaScript code are “programs” that sent over by the web server as part of the response, but are executed by the browser on the client’s computer. See the chapter JavaScript Fundamentals for details on JavaScript.
HTTP responses may also include additional asset files, such as images (.png, .jpg, .gif, etc), fonts, video or music files, etc.
Modern web browsers are able to render (interpret and display) all of these types of files, combining them together into the modern, interactive web pages you use every day. In fact, you can open up almost any file inside a web browser, such as by right-clicking on the file and selecting “Open With”, or dragging the file into the browser program. HTML files act as the basis for web pages, so you can open a .html file inside your web browser by double-clicking on it (the same way you would open a .docx file in MS Word):
2.3 Servers and Hosting
While this course focuses on client-side development (writing code that will be rendered by a browser), it’s impossible to do web development work without interactive with a server in some way. As noted above, a server is a computer that “serves” (provides) the resources, files, and data that are requested by a browser.
These files are stored on the server before being served—this is called hosting the resource (the resource gets to “live” on the server). Even when focusing on client-side web development, the files you want the browser to render need to be hosted (live) somewhere. You may be doing “local” development and testing, in which the files stay on your own computer rather than being on a remote machine elsewhere on the internet. In this case, it is possible to have your computer’s file system act as the “host”, or to use a development web server (see below).
But when you wish to make your website available to others (to “publish” it, called putting the site into production), then you will need to have a dedicated server that is able to host those files at a URL that others can access. There are a wide variety of web hosting services available on the internet. Some of them may be free of cost (often providing limited storage or bandwidth—the amount of data it can serve and number of requests it can respond to), while others may charge a monthly or yearly fee. There is no standard price; you will need to shop around for what service may fit your needs and your budget. The availability and quality of web hosting services changes frequently; recommending hosts are outside the scope of this text—though see Hosting with GitHub Pages for one simple free hosting method (that is used for this book)!
Note that in addition to hosting the files on a particular server, making a website available also requires having a URL at which others can access it. Most hosting services will provide such a URL—but if you want a particular name for the domain part of the URL (e.g., your own “.com”), then you will need to purchase and register that domain name. As with web hosting, there are multiple services that facility buying and registering domain names. When you register a domain, you can set it to refer to the location (IP) of your hosting server, so that users who go to that domain URL will be directed to your server, which can then serve the files. Thus if you want to make your own website there are often two things to purchase: web hosting (space and bandwidth) and a domain name. Purchasing a domain name is not necessary for hosting a website if you’re willing to accept the limits of the host’s naming schema—for example, this book is hosted at info340.github.io, which is free as a subdomain of github.io (GitHub Pages).
Hosting with GitHub Pages
As an easy and free way to make websites available, GitHub offers a free web hosting through a service called Github Pages. Because GitHub repositories already store code online, it is simple to make that code available as a resource to browsers (to host it on the web). You can host a site for a user or organization account, or you can make multiple site for different projects (repos). Project websites will be available at https://username.github.io/reponame—this will serve the root folder of the repo (in particular the index.html file found there).
It is possible to configure GitHub Pages for a particular repo through the Settings for that repo. However, I find that one of the best ways to publish a web project with GitHub Pages is use branching: in particular, any content that is on a branch named gh-pages will be automatically served as a hosted web page. This is a special feature provided by GitHub for branches with this particular name.
Using a separate branch has the benefit of helping to distinguish between your development code (the main branch—what is currently being worked on, and may containt bugs, errors, or unfinished parts) and the production code (the gh-pages branch—a “working” version that can be shared with others). By keeping these branches separate, you are able to do development and make potentially breaking changes without breaking the website for users who are accessing it. While it is possible to serve the main branch directly, it is best practice in software engineering to keep development and production versions separate. Never make changes in production!
Thus in order to publish a website whose code is in a GitHub repository, create a new branch for the repo called exactly gh-pages (using git checkout -b gh-pages). This is your production branch—any code that is on this branch can be pushed to GitHub and thus made available to users. Note that you will need to push the branch to GitHub in order for it to be served (using git push origin gh-pages while on that branch).
IMPORTANT: Never make changes on the production gh-pages branch! You always want to make any edits to your code on the main branch, and then merge those changes into the gh-pages branch. In fact, I remember never staying on the gh-pages branch longer than it takes to merge and push. Thus your workflow should look like:
## do all your coding on `main`!

# switch to gh-pages to publish
git checkout gh-pages

# merge the changes from main
git merge main

# push to GitHub to publish
git push origin gh-pages

# IMMEDIATELY switch back to main branch for more coding
git checkout main
Note that if you publish to production (push to gh-pages) and find a bug or problem in your site, you still need to fix that on the main branch following the above process. Yes this can seem awkward and tedious, but that’s why you need to test your work in development (on the main branch) thoroughly before pushing to production. This is an important software engineering practice!
Development Servers
As noted above, it is possible to request a .html file (open a web page) using the file protocol by simply opening that file directly in the browser. This works fine for testing many client-side programs. However, there are a few client-side interactions that for security reasons only work if a web page is requested from a web server (e.g., via the http or https protocol).
In these situations, you will need to develop client-side web applications using a local development web server. This is a web server that you run from your own computer—your machine acts as a web server, and you use the browser to have your computer send a request to itself for the webpage. Think of it as mailing yourself a letter. Development web servers can help get around cross-origin request restrictions, as well as offer additional benefits to speed development—such as automatically reloading the web browser when the source code changes.
There are a number of simple development servers that you can use:
live-serveris a Node package that runs a simple web server on the command line. You can run the program and “serve” files from the current folder using the commandnpx live-server .(the.referring to the current folder). This will open up yourindex.htmlfile in a browser (if not, you can view the page at http://localhost:8080 by default). It will also automatically refresh the page whenever you change a file in the folder!The Vite application for scaffolding React apps provides a webserver that is able to transpile React code. This is used when developing React apps (and only then). See Getting Set Up: React and Vite for details.
The Python [
http.server] module is able to run a simple web server. You will need to have Python 3 installed and available on your machine. You can then use the commandpython -m http.serverto serve the contents of the current folder, by default at http://localhost:8080.There are multiple extensions for VS Code that provide this functionality, including
LiveServerandvscode-previw-server.
When running a local web server, remember that the address 127.0.0.1 is the IP address for localhost which is the domain of your local machine (the “local host”). Most development servers, when started, will tell you the URL for the server’s root directory.
Most commonly, you will want to start the web server from the root directory of your project, so that the relative path index.html finds the file you expect.
You can usually stop a command line development server with the universal ctrl + c cancel command. Otherwise, you’ll want to leave the server running in a background terminal as long as you are working on your project.
2.4 Web Standards
In client-side development, the web files (.html, .css, and .js files) you author will be delivered to clients upon request and then interpreted and rendered by the web browser. Indeed, a web browser is any piece of software that is capable of rendering these files (and sending HTTP requests to fetch them in the first place). And there are a lot of different web browsers in the world! The below chart from StatCounter shows the relative popularity of different browsers:
Source: StatCounter Global Stats - Browser Market Share. See also caniuse.com’s usage table for information on mobile and older browsers.
These web browsers are all created by different developers, working for different (often rival!) organizations. And while there may be some clear “winners” in terms of browser popularity, you cannot dismiss less popular browsers. For example, even if only 0.1% of users use a particular browser (such as Internet Explorer), that’s still more than 5 million people worldwide! So in order to make sure that they are all able to render the same served resources, they all attempt to follow a set of web standards.
Web Standards are agreed-upon specifications for how web page source code should be rendered by the browser. Web standards detail both the language syntax (e.g., how to write HTML elements) and the language semantics (e.g., which HTML elements to use), so that it can be understood by any browser that follows (agrees to) that standard. And since as a developer you want your pages to render the same across all browsers, web standards give the requirements for how you need to write your code so that your pages render correctly.
Modern web standards are created and maintained by a large group of stakeholders known as the World Wide Web Consortium (W3C), which includes major browser developers such as Google, Apple, and Mozilla. However, this group has no enforcement powers: and so browsers often deviate from the published standards! A browser may ignore a standard to “help out” developers (e.g., making a “best guess” to render malformed HTML content), or to introduce new features (e.g., a new CSS property that produces some special effect). Some browsers are better at conforming to the established standards than others. Internet Explorer—IE 6 in particular—is notorious for not meeting standards and requiring extra effort from developers to make pages render correctly on those browsers. This is part of why IE has such a bad reputation and gets so much scorn from developers. (This failure to meet standards does not apply to Microsoft Edge).
Getting so many people to agree on a standard of communication takes time; thus web standards change relatively slowly: the HTML 4 standard was adopted in 1997, but the HTML 5 standard (that this course teaches) wasn’t finalized until 2014. The CSS 3 standard is broken up into more than 50 different modules that are developed and introduced independently, and so is continuously being adopted piece-wise.
When introducing new or experimental CSS properties, browsers historically used vendor prefixes in naming the properties. As standards are being decided upon, each browser may treat that property in a slightly different way, thus forcing developers who want to use the “latest and greatest” to provide a different definition or value for each vendor. Prefixes are a naming convention that will cause the property to only be understood and applied by a particular browser; e.g., -webkit-hyphens would use the Webkit version of the hyphens property (for controlling word breaks), while -ms-hyphens would use the IE (Microsoft) version. This practice is currently discouraged (with browsers using internal flags to manage experimental features) and being phased out, though prefixes may be required when supporting older browsers. Tools such as Autoprefixer can help automatically manage prefixes.
Writing “correct” code in web development means writing code that conforms to web standards. So even if content may seem to render correctly on your browser, if it doesn’t follow the standard then it may not work on someone else’s computer (or on your computer after a software update)! Thus the requirement for code to be correct in web development is that it not only looks correct when rendered, but that it follows the syntactic and semantic specifications of the web standards. In general, as long as your website conforms to the web standards, it will render correctly on all “modern browsers” (Chrome, Safari, Edge, Firefox, etc.)—though there may still be a few differences that appear between browsers or between operating systems.
In order to check what features are available on a particular browser, you can use a tool such as caniuse.com. This site lets you search for web features (e.g., “flexbox”) and then shows which browsers—and which versions of those browsers—support that feature. Green boxes indicate that the faeture is supported, yellow boxes indicate partial support, and brown boxes indicate not supported. It is probably the best source of information about browser support for features. https://compat-table.github.io/compat-table/es6/ has a similar table for the latest JavaScript features, and the documentation provided by the Mozilla Developer Network (MDN) also lists browser compatibility at the end of each listing.
Always develop for other people’s browsers, not just your own! Test your code against the standards, not just that it looks okay on a single browser.
One way to check that the code you are writing follows the standards is to validate it using an automated tool. The W3C provides online tools that can help validate code:
- W3C HTML Validation Service
- W3C CSS Validation Service
- W3C Developer Tools for a complete list of validators
To use these services, simply enter your web page’s publicly-accessible URL (or copy and paste the contents of your .html or .css files), and then run the validation. You will definitely need to fix any errors you get. Warnings should be considered; however, it is possible to get false positives. Be sure and read the warning carefully and consider whether or not it is actually a “bug” in your code!
This text does not include specifics needed to ensure that web pages work on every single browser—rather the focus is on introducing web development techniques that are standards-compliant. Supporting older browsers that are not standards-compliant (and ensuring that everyone can access your website) is left as an exercise to the reader.
2.5 Web Accessibility
Web standards do more than just establish the correct syntax for web code. Consider the following hypothetical webpage user:
Tracy is a 19-year-old college student and was born blind. Through high school she did well as she could relying on audio tapes and books and the support of tutors, so she never bothered to really learn Braille. She is interested in English literature and is very fond of short stories; her dream is to become an audiobook author. Tracy uses the Internet to share her writing and to connect with other writers through social networks. She owns a laptops and uses a screen reader called JAWS: a computer program which reads her screen out loud to her in an artificial voice. (Adapted from here)
One of the most commonly overlooked limitations on a website’s usability is whether or not it can be used by people with some form of disability. There are many different forms of disability or impairments that may affect whether or not a person can access a web page, including:
- Vision Impairments: About 2% of the population is blind, so use alternate mediums for reading web pages. Farsightedness and other vision problems are also very common (particularly among older adults), requiring larger and clearer text. Additionally, about 4.5% the population is color-blind.
- Motor Impairments: Arthritis occurs in about 1% of the population, and can restrict people’s ease at using a mouse, keyboard or touch screen. Other impairments such as tremors, motor-neuron conditions, and paralysis may further impact people’s access.
- Cognitive Impairments: Autism, dyslexia, and language barriers may cause people to be excluded from using your website.
If you fail to make your website accessible, you are locking out 2% or more of users, reducing the availability and use of your site. Indeed, even web companies with their capitalist world-view are see this population as an important but excluded market; for example, Meta has an entire team devoted to accessibility and supporting users with disabilities. “Accessibility Engineers” have good job prospects.
Supporting users with disabilities is not just the morally correct thing to do, it’s also the law. US Courts have ruled that public websites are subject to Title III of the Americans with Disabilities Act (ADA), meaning that is a possible and not uncommon occurrence for large organizations to be sued for discrimination if their websites are not accessible. So far, “accessibility” has legally meant complying with the W3C’s Web Content Accessibility Guidelines (WCAG) (see below), a web standard that is not overly arduous to follow if you consider accessibility from the get-go.
Finally, designing your website (or any system) with accessibility in mind will not just make it more usable for those with disabilities—it will make it more usable for everyone. This is the principle behind Universal Design (a.k.a. universal usability): designing for accessibility—being usable by all people no matter their ability (physical or otherwise)—benefits not just those with some form of limitation or disability, but everyone. The classic real-world example of universal design are curb cuts: the “slopes” built into curbs to accommodate those in wheelchairs. However, these cuts end up making life better for everyone: people with rollerbags, strollers, temporary injuries, small children learning to ride a bicycle, etc.
Universal design applies to websites as well:
- If you support people who can’t see, then you may also support people who can’t see right now (e.g., because of a bad glare on their screen).
- If you support people with motor impairments, then you may also support people trying to use your website without a mouse (e.g., from a laptop while on a bumpy bus).
- If you support people with cognitive impairments, then you may also support people who are temporarily impaired (e.g., inebriated or lacking sleep).
If you make sure that your web page is well-structured and navigable by those with screen readers, it will ensure that it is navigable by other machines, such as search engine indexers. Or for unusual or future browsers (such as virtual reality browsers perhaps).
Thus supporting accessibility in client-side web development is important both for helping a population that is often overlooked (a form of social justice), as well as for supporting new technologies and systems. This fact is increasingly being acknowledged by companies as key to usability, and thus it is important that you apply it to your own design and web work.
In addition to individual capabilities, people are also reliant on a large amount of existing infrastructure to ensure that they have an internet connection and their requests can reach your web server. The lack of such access is often tied to economic or social inequalities, forming what is called the digital divide. Considering the availability of network access and other infrastructural needs is vitally important when developing information technologies. In client-side development, this may include for example considerations such as the amount of data being served (e.g., the size of images used). See also Responsive Design for design considerations for devices with connectivity limitations.
Supporting Accessibility
Making web pages accessible is important. In this text, we will primarily discuss supporting accessibility for users with visual impairments such as those using screen readers. A screen reader is a piece of software that is able to synthesize and “read” content on a computer’s screen out loud through the speakers, so that users are able to navigate and control the computer without needing to see the screen. Screen readers are often combined with keyboard controls, so that users use just the keyboard to control the computer and not the mouse (almost like a command line interface!).
There are a number of different screen reader software packages available:
- Macs have had VoiceOver built into the operating system since 2005, though it has been refined with each new OS version.
- Windows has had a built-in screen reader called Microsoft Narrator since Windows 10. But the most popular screenreaders remain more established applications: JAWS and NDVA.
You should try out this software! Follow the above links to learn how to turn on the screen reader for your computer, and then try using it to browse the internet without looking at the screen. This will give you a feel for what it is like using a computer while blind.
Screen readers are just software that interpret the HTML of a website in order to allow the user to hear and navigate the content—they are basically non-visual web browsers. As such, supporting screen readers just means implementing your web site so it works with this browser. You can do this by ensuring that your site follows the web standards;—and in particular conforms to the Web Accessibility Content Guidelines (WCAG). This is a list of principles and techniques to use when authoring web documents in order to ensure that they are accessible. The guidelines are driven by 4 main principles:
- Perceivable: Information and user interface components must be presentable to users in ways they can perceive.
- Operable: User interface components and navigation must be operable.
- Understandable: Information and the operation of user interfaces must be understandable.
- Robust: Content must be robust enough that it can be interpreted reliably by a wide variety of user agents, including assistive technologies.
More concretely, accessible web pages are those that can be navigated by screen readers (so people can easily get to the information they care about), and have content that can be perceived by screen readers (so is not just presented visually).
Throughout this text (and particularly in Semantic HTML), you will learn simple, specific implementation steps that you can use to follow these principles and ensure that your web sites are accessible to all users.