Chapter 19 Firebase
This chapter discusses how to integrate and use the Firebase web service in a client-side application (using React). Firebase is a web service that provides tools and infrastructure for use in creating web and mobile apps that store data online in the cloud (a “web backend solution”). In effect, Firebase acts as a server that can host information for you, so that you can just build client-side applications without needing to program a web server.
- Firebase is owned and maintained by Google, but will still work perfectly fine with Facebook’s React framework.
In particular, this chapter will discuss the following features of Firebase:
The Firebase service also provide a number of “database” systems. This chapter describes how to use the realtime database, which provides a simple NoSql-style database: you can think of it as a single giant JSON object in the Cloud. Firebase provides methods that can be used to refer to this object and its properties, make changes to the object. Most importantly, it provides the ability to “listen” for changes made by others so that the page can automatically update based on actions taken by other users. In effect you can create a data binding between clients and the server, so that if you update data on one machine, that change automatically appears on another.
Firebase also offers additional database structures. Firestore is another NoSQL (document-based) database, but focused more on one-time data fetch queries rather than the continuous data binding provided by the realtime database. This chapter focuses on the Realtime Database as an easier-to-learn system and to practice data binding. Firebase Storage is used for storing larger data elements (anything that can’t be defined in JSON), such as images or videos, and is described at the end of the chapter.
The Firebase service also offers a client-side based system for performing user authentication, or allowing users to “sign in” to your application and have particular information associated with them. It’s possible to have users sign up with an email and password, or even using an external service (e.g., “sign in with Google”). Firebase also provides a way to manage all those extra interactions associated with accounts, like being able to reset passwords or confirm email addresses. And this is all performed securely from the client-side, without the need to set up an additional server to perform OAuth work.
These features mean that Firebase can be a go-to back-end for producing a client-side app that involves persisted data (like user accounts). And its free service tier is well-suited for any development app.
This chapter details how to use version 9+ of the Firebase library, released in August 2021—and in particular its modular API (which allows for smaller and more efficient bundles when using webpack and React). Note that while this version is conceptually the same as previous versions, the module syntax for calling and importing functions is different. See the upgrade guide for details. Be careful when looking up examples and resources that they’re use the same version as you!
Note that Firebase also provides Firebase Hosting for hosting and serving web applications. This is particularly useful for hosting single-page-applications, such as those built with React Router. Hosting does not require any modifications to your source code, so is not discussed here.
19.1 Setting up Firebase
Because Firebase is a cloud service, you will need to set it up externally in order to use it in your web application. Firebase setup and configuration is handled on Firebase’s website at https://firebase.google.com/, and in particular in the Firebase Web Console where you can manage individual projects.
When developing a Firebase app, keep the Web Console open all the time so you can check on database, user list, etc!
Creating a Project
In order to use Firebase in your web app, you will need to sign up for the service. Visit https://firebase.google.com/ and click the “Get Started” button to do so. You will need to sign in with a Google account (e.g., a UW account if you’ve set up Google integration). Signing up will direct you to the Firebase Web Console.
In the Web Console, you can manage all of your “projects”—one per application you’ve created (think: per repository). Each project will track its own database of information, its own set of users, etc.
You can create a project by clicking the “Add Project” button. On the next screen, you’ll need to give the app a unique name. Naming the project after your app is a good idea. This name is used internally by the Firebase syste; it won’t necessarily be visible to your users, though if you use Firebase Hosting then the project name will be part of the default URL for the application.
- Recommendation: do not enable Google Analytics for your projects!
Once you’ve created the project, you will be taken to the Web Console for that project. This is a web page where you will be able to manage the configuration of the project, the users who have signed up, and any data in the database. In particular, note the navigation menu on the left-hand side: you will use this to access different parts of your project (Realtime Database to manage the database, and Authentication to manage users)—expand the “Build” dropdown to navigate.
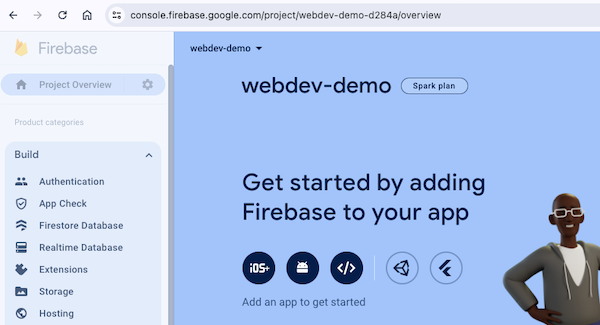
Firebase navigation menu
Including Firebase in React
In order to use Firebase in a web app (including a React app), you will need to add the Firebase library to your web page, as well as some specify some configuration data to connect to the correct Firebase project.
From the project’s Web Console page, click the button (it look like a </> in the above image) to add Firebase to a web app. This will take you to a new page where you’ll need to put in a nickname for the app and then present some JavaScript code for loading the Firebase library (make sure that “Use npm” is selected—you don’t want to include a <script> element!).
In a React app you you will integrate Firebase directly into your source code by modifying the index.js file:
First, install and Firebase library using
npm:# Note: do this in your app's repo (the folder with the `package.json` file) npm install firebaseThen, copy the provided
importstatement,firebaseConfigvariable, andinitializeApp()function call into yourindex.jsfile. This will specify which Firebase project your web app should connect to whenver you call functions to access Firebase.Note that you will need to paste this code before the call
ReactDOM.render(). Theindex.jsfile will often contain such configuration data that is relevant to the app rather than to a specific component.
Adding Collaborators to a Project
Referencing the Firebase Web Console is vital for everyone who is working with the Firebase backend on a project. If you’re working with a group of developers, you will want to make sure that all team members have access to this console.
You can add additional team members to a Firebase project by selecting “Users and permissions” from the “Project Overview” gear icon:
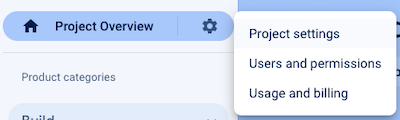
Users and permissions navigation
From there you can click on “Add Member” to add new members to the project.
19.2 Realtime Database
The Firebase web service provides a realtime database for storing and accessing data in the cloud. You can think of this database as being a single giant JSON object in the Cloud that can be simultaneously accessed and modified by multiple clients—and since each client reads the same database, changes made by one user will be seen by others as real-time updates.
For example, you might have a database that is structured like:
{
  "people" : {
    "amit" : {
      "age" : 35,
      "petName" : "Spot"
    },
    "sarah" : {
      "age" : 42,
      "petName" : "Rover"
    },
    "zhang" : {
      "age" : 13,
      "petName" : "Fluffy"
    }
  }
}
This database object has a people key that refers to an object, which itself contains keys that refer to individual “person” objects (each of which has an age and petName property).
In the Firebase Web Console (under the “Database” tab in the navigation menu), this data structure would be presented as:
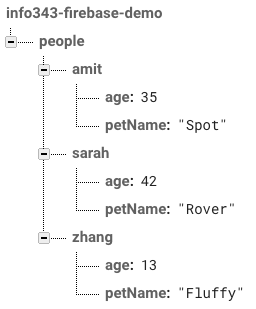
A Firebase database with sample people data
- Note that in the Firebase Web Console you can edit this database directly: viewing, adding, editing, and deleting elements in the JSON. This is useful for debugging—both to check that your code is editing the database accurately, and to clean up any mistakes.
Although the JSON database can have many levels of nested objects, best practice is to try and keep the structure as “flat” as possible and avoid nesting too much data. This avoids you needing to download the nested “details” for a value if you only need to know e.g., the key names. See Structure Your Data for more details and examples.
Setting Up the Database
In order to enable the realtime database for your project, navigate to the console page for the database and click the “Create Database” button.
Make sure you’re creating the Realtime Database, not the Firestore Database!
After selecting your local region, you’ll be prompted to set up the Security Rules. Choose to start in test mode to get started immediately; see the below section for more about security rules.
Security Rules
Because the Firebase database is just a giant JSON object in the cloud and is usable from a client-side system, technically anyone can access it. Each element of the JSON object is accessible via AJAX requests (which are sent via firebase functions).
In order to restrict what clients can access this information (read or write to values in the JSON), Firebase lets you define security rules that specify what users can access which elements. For example, you can make it so that only authenticated users can add new entries the database, or that only specific users can update specific entries (e.g., the comments they wrote on a blog).
- By default, no one can access or modify the data (in locked mode). If you choose to start your project in test mode, then anyone will be able to access or modify the entire database for a limited amount of time.
In order to modify or configure the security rules, navigate to the “Rules” tab of the Realtime Database’s page in the Firebase Web Console. You can modify the rules by editing the presented JSON data; remember to hit “Publish” after you’re done editing.
Firebase Security Rules are defined in JSON using a particular (and somewhat awkard) scheme. Basically, inside the "rules" property you specify a JSON tree that mirrors the structure of your database. But instead of having a value for the keys in your database, you specify an object with ".read" and ".write" properties. The values of these properties are boolean expressions that state whether or not the current user is able to read (access) or write (modify) that value. For more on writing rules, such as how to handle user authorization (only certain users can read/write access) or data validation (making sure all data is written of a certain type), see the official documentation.
Data References
To start working with your database, you will need to get a reference to that value in the database.
You begin by getting a reference to the database itself, using the getDatabase() function provided by Firebase’s database module firebase/database:
//import the function from the realtime database module
import { getDatabase } from 'firebase/database';

//get a reference to the database service
const db = getDatabase();
Importantly, the db value in the example is not a copy of the data or even the database itself! It’s instead just a reference pointer to where that database lives—you can think of it more like a “URL” for the database.
- The
getDatabase()function is a simple singleton accessor that runs in constant time; it’s best practice to call it scoped in whatever functional scope you need to refer to the database. You do not need topass it around as a prop, nor should you try to make a “top level” or globaldbvariable. Just call the function again if you need to access the database from a separate scope.
In order to modify any particular values in the database, you will need to get a reference to that value. This is done by using the ref() function, passing in the database reference and the “path” (a string) to the data value in the database’s JSON:
import { getDatabase, ref } from 'firebase/database';

//get a reference to the database service
const db = getDatabase();

//get reference to the "people"" property in the database
const peopleRef = ref(db, "people")

//get reference to the "sarah" property inside the "people" property in the database
//similar to `database.people.sarah` using dot notation
const sarahRef = ref(db, "people/sarah");
Again, these reference are not the data! They are just reference pointers to where the data lives—like the “URL” for that data value.
The “path” to nested values in the database are written in a URI-style “path notation”, where each nested key is indicated by a slash / (rather than the . in dot notation as you’d normally use with JSON format). Thus "people/sarah" refers to the sarah key inside of the people key inside of the database; "people/sarah/pet" refers to the pet key inside the sarah key inside the people key—the spot in the database with the value "Rover" in the above example.
Since this path is just a string, you can use string concatenation to construct the path to a particular value you wish to reference (e.g., if you only want to work with the value for a particular person):
//variable name to access
const personName = "Ada";

//access the "Ada" property inside of the "people" property inside the database
const personOfInterestRef = ref(db, "people/"+personName);
Alternatively, you can use the child() function to get a reference to a specific “child” element in the database:
import { ref, child } from 'firebase/database';

//equivalent to the above example

//get reference to the "people" property in the database
const peopleRef = ref(db, "people")

//get reference to the "sarah" property inside of the "people" reference'd value
const sarahRef = child(peopleRef, "sarah")
In general, you want to work with a small a subset the data as possible. Thus it’s better to get a reference to "person/sarah" if you’re only going to read or write to that value, rather than get a reference to the whole "people" and then just read/write the sarah key in that.
Writing Data
You can modify values in the database by using the set() function. This function takes two arguments: a database reference, and then the new value you want to assign to that location in the database:
//alias the `set` function as `firebaseSet`
import { ref, set as firebaseSet } from 'firebase/database'

//get a reference to where sarah's age is stored in the database
const sarahAgeRef = ref(db, "people/sarah/age");

//change Sarah's age to 43 (happy birthday!)
const newValueForSarahAge = 43;

//assign the new value in the database
firebaseSet(sarahRef, newValueForSarahAge);
This will change the value in the database at "people/sarah/age" to 43.
Note that in this example, I use the as keyword to alias the set function when importing it, instead calling it firebaseSet. This is for clarity, as “set” is an overly generic name for a function.
Note that as with normal JSON objects, you can also “set” values for database entries that didn’t previously exist—you do not have to “declare” a value in the database ahead of time
//a reference to the people entry in the database
const peopleRef = ref(db, "people")

//a reference to a location with no currently defined value
const adaRef = ref(peopleRef, "ada");

//set an object to that location in the database
firebaseSet(adaRef, {age: "206", pet: "Charlie"})
Firebase also provides an equivalent method update(), which will “merge” in changes to the existing value at a reference. This allows you to update() the a reference pass in an object with some properties to be modified, while existing properties are be retained (rather than having the entire value at that reference be replaced).
Finally, note that the set() method returns a Promise. Thus you can use .then() (or await) to execute statements after the database has updated, and you can thus catch any errors that may occur when attempting to update a value. This is especially useful for debugging, but also is good for providing user feedback.
const sarahPetRef = ref(db, "people/sarah/pet");

//change Sarah's pet
firebaseSet(sarahPetRef, "Sparky")
    .then(() => console.log("data saved successfully!"))
    .catch(err => console.log(err)); //log any errors for debugging
Listening for Data Changes
Because Firebase’s database is intended for realtime access (that may change over time), you read data from it and establish data binding by registering an event listener to listen for changes to that database. In effect, any modifications to the data causes a “database change event” which triggers your listener, allowing you to acccess the new updated data.
You register a database change listener by using the onValue() function. This function takes as arguments a database reference (which value you want to listen for changes to) and a callback function that will be executed in response to the event (similar to the DOM’s addEventListener() function):
import { ref, onValue } from "firebase/database"

//get a reference to a particular value location in the database
const amitRef = ref(db, 'people/amit');

//register a listener for changes to that value location
onValue(amitRef, (snapshot) => {
    const amitValue = snapshot.val();
    console.log(amitValue); //=> e.g., { age: 35, petName: "Spot" }
    //can do something else with amitValue (e.g., assign to a state variable)
});
The callback function will be passed as a parameter the latest snapshot of the data value at the listening location. This is a wrapper around the database’s JSON tree (allowing you to navigate it e.g., with child()). Most commonly, you will want to convert the snapshot into an actual JavaScript object by calling the .val() method on it.
The listener will trigger whenever any child node of the targeted refence location changes. Thus even if just people/amit/pet is updated, the above listener will trigger.
Importantly, because this listener involves network access and can trigger throughout the life of your application, in a React app you will need to register the listener inside an effect hook. The effect hook’s “cleanup function” will also need to remove the listener—otherwise you will have a memory leak and can get errors if your component gets removed (e.g., by changing routes). The onValue() function returns a new function that can be used to “unregister” the listener:
function MyComponent(props) {
  //effect hook
  useEffect(() => {
    const db = getDatabase();
    const amitRef = ref(db, "people/amit");

    //returns a function that will "unregister" (turn off) the listener
    const unregisterFunction = onValue(amitRef, (snapshot) => {
      const amitValue = snapshot.val();
      //...set state variable, etc...
    })

    //cleanup function for when component is removed
    function cleanup() {
      unregisterFunction(); //call the unregister function
    }
    return cleanup; //effect hook callback returns the cleanup function
  })
}
Note that it is possble to read a single value once (without needing to register a listener) by using the get() method. This method returns a promise that will contain the read snapshot (once it is downloaded). However, the Realtime Database is intended and optimized for data binding and notifications. Thus you should pretty much always be using onValue() to read data from the database. If you find yourself wanting to just read a single value once, you’re not thinking about the realtime database correctly!
Firebase Arrays
When working with and storing data in the cloud, we often want to organize that data into lists using arrays. However, Firebase does not directly support support arrays: the JSON object in the sky only contains objects, not arrays! This is because Firebase needs to support concurrent access: multiple people need to be able to access the data at the same time. But since arrays are accessed by index, this can cause problems if two people try to modify the array at the same time.
- The problem is that with an array, an index number doesn’t always refer to the same element! For example, if you have an array
['a', 'b' 'c'], then index1may initially refer to the'b'. However, if you add an element onto the beginning of the array, then suddenly that1index refers to the'a'. And so if a user was trying to modify the'b'before their machine was aware of the change, they may end up editing the wrong value when they ask to change the value at index1! This bug is an example of a race condition, which can occur when two processes are modifying data concurrently (at the same time).
To avoid this problem, Firebase treats all data structures as Objects, so that each value in the JSON tree has a unique key. That way each client will always be modifying the value they expect. However, Firebase does offer a way that you can treat Objects as arrays, in the form of a push()(https://firebase.google.com/docs/reference/js/firebase.database.Reference#push) function that will add a value to an object with an auto-generated key.
import { getDatabase, ref, push as firebasePush } from 'firebase/database';

const db = getDatabase;
const tasksRef = ref(db, "tasks"); //an object of tasks

firebasePush(taskRef, {description:'First things first'} ) //add one task
firebasePush(taskRef, {description:'Next things next'} ) //add another task
This will produce a database with a structure:
{
  "tasks" : {
    "-KyxgJhKOVeAj2ibPxrO" : {
      "description" : "First things first"
    },
    "-KyxgMDJueu17348NxDF" : {
      "description" : "Next things next"
    }
  }
}
Notice how the tasks property is an Object (even though we “pushed” elements into it), and each “task” is assigned an auto-generated key (based on the timestamp it was pushed). You can still interact with tasks as if it were an array-like list, but instead of using a value from 0 to length as the index, you’ll use a generated “key” as the index.
Always use the push() function to have Firebase automatically manage data arrays for you. Never try to manually create an “array” by giving values keys “0”, “1”, “2” etc.
Firebase snapshots do support a forEach() function that you can use to iterate through their elements, allowing you to loop through the elements in an array. However, if you want to do something more complex (like map(), filter(), or reduce()), you need an actual array. The best way to get this is use call Objects.keys() on the snapshot.val() in order to get an array of the keys, and then you can iterate/map those keys into an array of values (accessing each element in the “array” using bracket notation).
//`tasksSnapshot` is a snapshot of the `tasks` "array"
const allTasksObject = tasksSnapshot.val(); //convert snapshot to value

//an array of the keys in the object ["-KyxgJhKOVeAj2ibPxrO", "-KyxgMDJueu17348NxDF"]
const allTasksKeys = Object.keys(allTasksObject);

//map array of keys into array of tasks
const allTasksArray = allTasksKeys.map((key) => {
    const singleTaskCopy = {...allTasksObject[key]}; //copy element at that key
    singleTaskCopy.key = key; //locally save the key string as an "id" for later
    return singleTaskCopy; //the transformed object to store in the array
});

allTasksArray.map((taskObject) => { ... })
Note that when looping through an “array”, each element is handled separately from its key (the same way that a forEach() loop lets you work with array elements separately from their index). But since you may need that key as an identifier in order to ref() and modify the JSON element later, you should make sure that you “save” the key in the object as you processing it as an additional local property. This won’t modify the value in the database, just the local variable that your code is working with. Don’t lose your key!.
19.3 User Authentication
Firebase provides the ability to authenticate users: to let people sign up for you application and then to check that they are who they say (e.g., have provided the right password). Firebase supports multiple different forms of authentication: users can sign up with an email and password, log in with a social media service such as Google or Facebook, or even authenticate “anonymously” (so you can at least keep track of different people even if you don’t know who they are).
In order to support user authentication, you will need to enable this feature in the Firebase Web Console. Click on the “Authentication” link in the side navigation menu’s Build capetgory to go to the authentication management page, then choose “Get started”. Under the “Sign-In Method” tab, you can choose what forms of authentication you wish to enable.
For example, click on the “Email/Password” option, and then flip the switch to “Enable” that method. Be sure and Save your changes!
Each different sign-in method uses what is called a “Provider”—a service that provides the information about whether the user is who they say. Firebase’s email/password check is a possible Provider; Google is a possible Provider; etc. You can enable multiple different Providers, each of which will be able to authenticate users (i.e., letting them sign in with the relevat credentials).
Note that you will be able to use this page to see and manage users who have signed up with your Firebase project. This is where you can see if uses have successfully been created, look up their User UID for debugging, or delete users from the project:
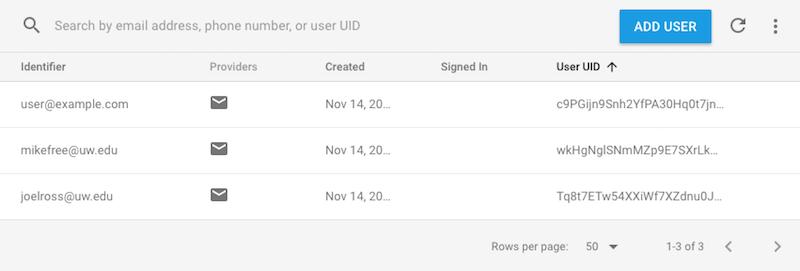
Firebase users as presented in the authentication web console
Signing In with FirebaseUI
It is possible to call functions provided by Firebase in order to create and log in users. However, this would require you to implement the “log in form” on your own—and would only easily support the Email/Password authentication option.
Instead, a nicer approach is to use the FireabaseUI library, also managed by Firebase. This library provides a set of predefined UI elements like a “login form”, including ones which will support different authentication methods.

Example of FirebaseUI authentication
There are different FirebaseUI libraries for different platforms; previously for React you would use firebaseui-web-react. However, as of November 2022 this library has not been updated to work with the latest version of React (React 18), and appears to have been been abandoned rather than applying the needed fix.
In order to work around this, I’ve created a fork with updated dependency listings, allowing it to be installed and function with the current version of React:
# install library on the command line
npm install https://github.com/joelwross/firebaseui-web-react
Confirm that your package.json file has the correct dependency listed:
"react-firebaseui": "github:joelwross/firebaseui-web-react"The React FirebaseUI library provides a Component called <StyledFirebaseAuth>, which you can render in your page like any other Component. You can think of this Component as the “login form”. A complete example of how this Component is used can be found below, following by an explanation.
//import auth functions and variables from Firebase
import { getAuth, EmailAuthProvider, GoogleAuthProvider } from 'firebase/auth'

//import the component -- note the need to import from a folder because it was
//installed directly from a GitHub repo
import StyledFirebaseAuth from 'react-firebaseui/dist/StyledFirebaseAuth';

//the React compnent to render
function MySignInScreen() {

  const auth = getAuth(); //access the "authenticator"

  //an object of configuration values
  const firebaseUIConfig = {
    signInOptions: [ //array of sign in options supported
      //array can include just "Provider IDs", or objects with the IDs and options
      GoogleAuthProvider.PROVIDER_ID,
      { provider: EmailAuthProvider.PROVIDER_ID, requiredDisplayName: true },
    ],
    signInFlow: 'popup', //don't redirect to authenticate
    credentialHelper: 'none', //don't show the email account chooser
    callbacks: { //"lifecycle" callbacks
      signInSuccessWithAuthResult: () => {
        return false; //don't redirect after authentication
      }
    }
  }

  //At time of writing, need to access the `.default` value of the imported modules...
  return (
    <div>
      <h1>My App</h1>
      <p>Please sign-in:</p>
      <StyledFirebaseAuth.default uiConfig={firebaseUIConfig} firebaseAuth={auth} />
    </div>
  );
}
There are a few steps to using this Component:
The
<StyledFirebaseAuth>requires afirebaseAuthprop, which is a reference to the “authenticator” service—what will handle the process of the user logging in and out. You can get access to this value via thegetAuth()function provided by'firebase/auth'(similar to how you get access to the Realtime Database via thegetDatabase()function).Note that as with
getDatabase()the authenticator is a singleton value—you can callgetAuth()from multiple modules/files/scopes without concern. You do not need to pass it around as a prop or declare it as a “top-level” constant.The
<StyledFirebaseAuth>also requires auiConfigprop, which is an object containing configuration values for that login form (the object has specific properties which correspond to configuratoin options). The config object is usually defined as a global constant.The most important configuration option is the
signInOptions, listing the different authentication providers supported (what options should show up in the login form). The IDs for these providers are imported from the'firebase/auth'library—though they are numeric values, not functions.Other common/useful options are shown in the example; for a complete list of options see the firebaseui-web documentation.
With this Component, users will be able to “log in”, though see the Managing the User section below. You will be able to see a list of users who have connected to your app in the Firebase Web Console. Note in particular that you can see their uid (unique identifier), which is what is used to distinguish between users. (You can’t use emails as identifiers, because someone who logs in with Facebook won’t provide their email address!).
Pro-tip: You don’t need to come up with real email addresses for testing. Try using a@a.com, b@a.com, c@a.com, etc. Similarly, password works fine for testing passwords (though you should never do that in real life!)
The Firebase Web Console will provide a view of the “user list”—but importantly, this is not the same as the Realtime Database. The user list holds very limited information: the authentication provider, a “display name”, and possibly a “photo url” (e.g., where to find an avatar image). But you cannot store any additional information in the “user database”—not profile images, not preferred names or pronouns used, not favorite fish. Any user-specific information will need to be stored in the Realtime Database instead, usually using a “key” that is the user’s uid. For example, your Realtime Database might store information like:
{
  "userData" : {
    "userId1" : {
      "pronouns" : "they/them",
      "favoriteFish" : "sea bass"
    },
    "userId2" : {
      "pronouns" : "he/him",
      "favoriteFish" : "cuttle fish"
    }
  }
}
You can then access the user’s data using the same process as any other data in the realtime database, listening to the reference "userData/"+userId.
In order to sign out a user, you can use another built-in Firebase function: signOut():
import { getAuth, signOut } from 'firebase/auth';

const auth = getAuth();

signOut(auth)
    .catch(err => console.log(err)); //log any errors for debugging
Note that the signOut() method returns a Promise, so you can .catch() and display any errors.
Managing the User
Although FirebaseUI will log in a user, you will need to do further work in order for your app to know who that logged in user is.
The authenticator (from getAuth()) will keep track of which Firebase User is currently logged in—and this information persists even after the browser is closed. This means that every time you reload the page, the authenticator will automatically perform the authentication and “re-login” the user.
The recommended way to determine who is currently logged in is to register an event listener to listen for events that occur when the “state” of the authentication changes (e.g., a user logs in or logs out). This event will occur when the page first loads and Firebase determines that a user has previously signed up (the “initial state” is set), or when a user logs in or out. You can register this listener by using Firebase’s onAuthStateChanged() function:
//import functions
import { getAuth, onAuthStateChanged } from 'firebase/auth'

const auth = getAuth();

onAuthStateChanged(auth, (firebaseUser) => {
    if(firebaseUser){ //firebaseUser defined: is logged in
        console.log('logged in', firebaseUser.displayName);
        //do something with firebaseUser (e.g. assign to a state variable)
    }
    else { //firebaseUser is undefined: is not logged in
        console.log('logged out');
    }
});
The onAuthStateChanged() function takes in two arguments: the authenticator, and a callback function that will be executed whenever the “authentication state” changes (e.g., whenever the user logs in or out). The callback function will be passed an object representing the “Firebase User”. This object contains properties about the user, including:
uid, which is the unique id for the userdisplayName, which is the user’s provider-independent displayable name
The most common practice is to take this passed in object and assign it to a more global variable, such as a state variable in a React component (e.g., setCurrentUser(firebaseUser)).
If the user “logged out”, then the passed in firebaseUser value will be null; this information can also be saved to the React state variable.
Importantly, because this listener involves network access and can trigger throughout the life of your application, in a React app you will need to register the listener inside an effect hook. The effect hook’s “cleanup function” will also need to remove the listener. The onAuthStateChanged() function returns a new function that can be used to “unregister” the listener:
function MyComponent(props) {
  //effect hook
  useEffect(() => {
    const auth = getAuth();

    //returns a function that will "unregister" (turn off) the listener
    const unregisterFunction = onAuthStateChanged(auth, (firebaseUser) => {
      //handle user state change
      if(firebaseUser){
        //...
      }
    })

    //cleanup function for when component is removed
    function cleanup() {
      unregisterFunction(); //call the unregister function
    }
    return cleanup; //effect hook callback returns the cleanup function
  })
}
Firebase React Hooks
In React systems it is common to render different content depending on whether the user is logged in. This could be done with conditional rendering, or with a “protected route” as described in Client-Side Routing.
However, it takes a few seconds for Firebase to authenticate a user when a page first loads. Thus your conditional rendering will often need to handle 3 cases: when a user is logged in, when a user is not logged in, and when the user status is “loading” and the app hasn’t finished checking yet.
While there are some cludgy workarounds (e.g., use a special value for your state to indicate that a user is “loading”), this is a common enough situation that you can use solutions implemented by other people. One such option is the firebase-react-hooks library. This library provides a simple hook (like useState or useParams) that lets you access the user status. In particular, the useAuthState hook will implement the authentication state listener for you:
import { getAuth } from 'firebase/auth';
import { useAuthState } from 'react-firebase-hooks/auth';

function MyComponent(props) {
  const auth = getAuth();
  const [user, loading, error] = useAuthState(auth);

  if(loading){ //still waiting
    return <p>Initializing user</p>
  }

  if(error) { //error logging in
    return <p>Error: {error}</p>
  }

  if(user) { //user is defined, so logged in
    return <p>Welcome {user.displayName}</p>
  } else { //user is undefined
    return <p>Please sign in</p>
  }

  //...
}
This hook returns an array of 3 values (which are destructured in the above example), indicating the current user (or null for no user), whether the auth state is still loading, and whether there was an error.
While using such a library is not necessary, it is a good example of how React’s architecture allows for external libraries that can help reduce boilerplate code.
19.4 Firebase Storage
Firebase’s Realtime Database persists JSON data: so in the end just strings, numbers, and booleans (even if those values are organized into objects). If you wish to persist data files—such as music, video, pdfs, etc—you need to use a different service called Firebase Storage. Storage is designed for storing larger files rather than primitive data types. In the end it works fairly similarly to the realtime database, though without data binding.
As of October 2024, Firebase requires you to sign for a “pay-as-you-go” plan to provision a storage bucket. This requires providing credit card information. Students in the INFO 340 course do not need to sign up for this plan; talk to the instructor for details.
Under this plan you get up to 5 GB of storage for free (with 1 GB/day of downloading allowed). That’s about 5000 hi-res images, 1000 music files, or maybe 20 hr of compressed video. This means that the free storage service will work great for most development versions of media applications–though you may run out of space quickly if working with video, especially when testing. Always consider the amount of data you will need to store before choosing a cloud storage service.
In order to use Firebase Storage, you will need to enable this feature in the Firebase Web Console. Click on the “Storage” link in the side navigation menu’s Build capetgory to go to the authentication management page, then choose “Get started”. Similar to the realtime database, you’ll need to choose security rules (probably being in test mode for development). When prompted for a Cloud Storage bucket location, pick something nearby to speed up access a little, but for most student projects it doesn’t matter much.
Once you have set up Storage, you can use the Firebase Web Console to view and manage files that have been uploaded (including deleting them if desired).
File Inputs
In order for a user to upload a file to Storage, the user will need to first choose which file they want to store. The correct way to do this is to use a "file" type <input> element:
<input type="file">This element works the same as other <input> elements you’ve used (usually with the default type of "text"). But rather than providing an interface for the user to provide a string as a value, the input will provide an interface for the user to choose a file from their operating system.
This is an <input> like any other, which means that in React you should use a state variable to control it!
Once the user choses a file, you can access that the files chosen through the .files property of the <input> element—similar to the .value property used with default <input> elements. Note that the operating system’s file picking dialog may allow the user to choose multiple files (or none at all!); you will will want to check this when responding to any changes to the input:
//an event handler function that responds to changing in an `<input type="file">`
const handleChange = (event) => {
  //the event.target is the <input> element
  //check e.g., that the user picked at least 1 file, and that the file they picked actually exists
  if(event.target.files.length > 0 && event.target.files[0]) {
    const chosenFile = event.target.files[0]; //the first file chosen
    //... do something with that value, such as store it in React's state
  }
}
Note that the chosenFile will be a File-type value, which has its own set of methods and properties. Critically, the File value is really just a reference to a location in your computer’s operating system; if the file gets moved or renamed then the File will be pointing at something with no size, so you won’t be able to upload it.
Uploading Files
Once you have the File the user wants to upload, you can upload that data to Firebase using a method similar to how you set data in the realtime database.
First, you need to get a reference to the location in Storage where you want to upload the file. You do this by using the ref() function from the firebase/storage library:
import {getStorage, ref as storageRef } from 'firebase/storage';

//get a reference to the storage service
const storage = getStorage();

//get a reference to where the file will go in storage
const fileRef = storageRef(storage, "path/to/myfile.png");
Importantly, this is a different ref() function than the one used with the realtime database! They are not interchangeable. For that reason, you can alias the storage’s ref as e.g., storageRef in order to use both in the same module.
The ref() function takes as arguments the reference to the storage service and a string representing the “file path” for the new file—where it will go in the Storage bucket. You write this string like any other relative file path; it includes both any intermediate directories as well as the name of the resulting file. Any directories you include in the path will be created when the file is uploaded (they do not have to exist previously), and if a file already exists at that location, it will be overwritten. Be sure to include the file extension when naming the file (and you’ll want that file extension to match the actual file type!)
Once you have a reference to the file’s location in storage, you can use the uploadBytes() function to upload the file:
import {getStorage, ref as storageRef, uploadBytes } from 'firebase/storage';

const storage = getStorage();
const fileRef = storageRef(storage, "path/to/myfile.png");

uploadBytes(fileRef, myFile)
  .then(() => console.log("file successfully uploaded!"))
  .catch(err => console.log(err)); //log any errors for debugging
The uploadBytes() function is asynchronous (it can take a while to upload large files!) and returns a Promise that you can use to respond when the file has finished uploading or to catch and process errors.
Once a file has been uploaded, Firebase will give it a public URL (with the usual https:// protocol) where websites and users can access it. This public URL is different and constructed from the ref path that was specified, and will vary based on the storage parameters used by Firebase. So in order to figure out the resulting URL for this file (e.g., so you can show the file to the user again, you will need to request that URL from Firebase. You do this by using yet another function called getDownloadURL(). The function takes the file’s ref as an argument, and will query Firebase for the public URL of the file.
But querying Firebase is a network operation, which means that it takes time… Thus getDownloadURL() is asynchronous doesn’t return the actual URL, but a Promise for that URL; you will need to wait for that promise to resolve to access the URL string. Since uploading the file and getting the public URL are both asynchronous functions that return Promises, this operation is a good place to use async/await syntax to help keep the code readable rather than having a sequence of Promises.
import {getStorage, ref as storageRef, uploadBytes, getDownloadURL } from 'firebase/storage';

//await calls need to go in an async function
async function uploadFile() {
  const storage = getStorage();
  const fileRef = storageRef(storage, "path/to/myfile.png");

  try { //try/catch to handle errors
    await uploadBytes(fileRef, myFile) //asynchronous upload
    const url = await getDownloadURL(fileRef); //asynch query for public URL
    //...do something with the url, such as set it to state for rendering
    //...or save that url in the realtime database
  } catch (err) {
    console.log(err); //log any errors for debugging
  }
}
Note that it is normal to take the public URL and to also set it to a location in the realtime database; this allows an uploaded image to be associated with some other data values. The realtime database stores the url to the file (a string, stored in JSON), but the file itself is kept in Firebase Storage.