Chapter 12 Document Object Model (DOM)
The primary purpose of using JavaScript in a web page is to make that page interactive: the JavaScript language is used to program logical decisions that will effect what is shown on the page. It does this primarily by changing the HTML rendered by the browser. For example, JavaScript can be used to change the text inside a <p>, add addition <li> elements to a list, or to give a <div> a new CSS class attribute. The programmatic representation of the HTML elements currently being shown by the browser is known as the Document Object Model (DOM). In web programming JavaScript code is used to modify the DOM (HTML elements currently being shown by the browser) in response to user input, thereby making the page interactive. This chapter introduces the Document Object Model and how to use JavaScript to manipulate it through user-driven interaction.
12.1 The DOM API
As you should recall from Chapter 3, HTML elements can be nested, allowing us to consider a webpage as a “tree” of elements:
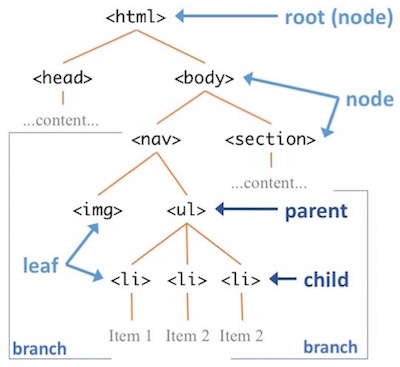
An example DOM tree (a tree of HTML elements).
- A tree is a hierarchical data structure, where each element (called a node) contains references to child elements. Following the arboreal metaphor, the “start” of the tree is called the root note, hierarchical sequences of nodes are called branches, and a node that does not have any children is called a leaf.
Considering a web page’s content to be a tree of HTML elements is one way to model (represent) the structure of that information. This particular model of a web document (as a tree of object nodes) is called the Document Object Model, or DOM for short. In many ways the DOM is the HTML (though the HTML rendered in the browser, not the .html source code you’ve written)! Thus we can refer to the web page’s content as “the DOM”, and an HTML element as a “DOM element”.
- Note that even “plain text” content (e.g., what is inside a
<p>tag) are considered nodes in the DOM tree—they are “text content” nodes (instead of “element nodes”).
Moreover, the DOM also provides an Application Programming Interface (API) which allows computer applications to programmatically (e.g., through JavaScript code) interact with it: accessing and manipulating the tree of elements. As you may recall from previous courses, an API is often a set of functions and variables that can be used give instructions to a program. The DOM API is no different: it is a group of functions you can call and variables (usually Object properties) you can adjust to change the rendered web content. You write code to call these functions in order to make a page interactive.
Global Variables
You can programmatically access the API in JavaScript by utilizing a set of global variables. Global variables are variables that are “globally” scoped: they are available anywhere in the program (not just within a particular function).
An important programming style rule is to minimize the use of global variables. Try to avoid creating too many new globals yourself!
Global variables in JavaScript are almost always Objects that have methods as their values. For example, the JavaScript language itself provides a global Math object that has includes a number of function properties (e.g., sqrt(), floor(), etc.).
console.log( typeof Math );  //=> 'object'
console.log( typeof Math.sqrt );  //=> 'function'
console.log( Math.sqrt(25) ); //=> 5- In fact, the
consoleobject is another global variable provided by the JavaScript runtime (whether inside the browser or inside Node.js)!
The web browser also provides a number of global variables that you can use. For example window is a global object that represents the browser itself. You can use this object to get information about the browser:
/* example properties */
let width = window.innerWidth;   //viewport width
let height = window.innerHeight; //viewport height
var url = window.location.href; //url for this page

/* example functions */
window.alert("Boo!"); //show a popup alert. Do not use this.
window.scrollTo(0, 1000); //scroll to a position
window.setTimeout(callback, 1000); //execute callback after an delay
window.setInterval(callback, 1000); //execute callback repeatedly after interval
While these examples are included for completeness, most window functions are rarely used and should be avoided. Popups with the window.alert() function are inelegant, interrupt the user’s actions, and produce a bad user experience—you should instead use in-window alerting options instead (such as showing a <p class="alert">). Browser control functions such as scrollTo() are non-standard and can vary drastically across systems and platforms. Proceed with caution when using window functions!
12.2 DOM Manipulation
While window represents the Browser, the DOM itself is represented by the document global object—document is the DOM (the current HTML rendered in the browser). You access properties and call methods of this object in order to manipulate the content displayed in the browser!
Referencing HTML Elements
In order to manipulate the DOM elements in a page, you first need to get a reference to the element you want to change—that is, you need a variable that refers to that element. You can get these variable references by using one of the document “selector” functions:
//element with id="foo"
let fooElem = document.getElementById('foo');

//elements with class="row"
let rowElems = document.getElementsByClassName('row'); //note the plural!

//<li> elements
let liElems = document.getElementsByTagName('li'); //note the plural!

/*easiest to select by reusing CSS selectors! */
let cssSelector = 'header p, .title > p';  //a string of a CSS selector

//selects FIRST element that matches css selector
let elem = document.querySelector(cssSelector);

//matches ALL elements that match css selector
let elems = document.querySelectorAll(cssSelector);
The
document.querySelector()is by far the most flexible and easy to use of these methods: it can easily do the same as all the other methods (just put in an id, class, or element selector). You should always usequerySelector().Note that the methods that return multiple nodes (e.g.,
querySelectorAll) return aNodeListobject. While this is like an array (you can access elements via index through bracket notation and it has a.lengthproperty), it is not an array: meaning it doesn’t support methods likeforEach()andmap()across all browsers. If you need to iterate through aNodeList, you should use a regularforloop. But in practice, you’re much more likely to only work with single elements at a time.
Modifying HTML Elements
Once you have a reference to an element, you access properties and call methods on that object in order to modify its state in the DOM—which will in turn modify how it currently is displayed on the page. Thus by modifying these objects, you are dynamically changing the web page’s content!
Important: setting these properties do not change the .html source code file! Instead, they just change the rendered DOM elements (think: the content stored in the computer’s memory rather than in a file). If you refresh the page, the content will go back to how the .html source code file specifies it should appear—unless that also loads the script that modifies the DOM. What is shown on the page is the HTML with the JavaScript modifications added in.
Changing Content
You can use JavaScript to access and modify the content of a DOM element (e.g., the stuff between the start and close tags):
//get a reference to the FIRST <p> element
let elem = document.querySelector('p');

console.log(elem); //to demonstrate

let text = elem.textContent; //the text content of the elem
elem.textContent = "This is different content!"; //change the content

let html = elem.innerHTML; //content including HTML
elem.innerHTML = "This is <em>different</em> content!"; //interpreted as HTML
The textContent property of the element refers to all of the content, but considered as “plain text” this means that it is considered a “safe” property: you can assign strings that contain’s HTML code (e.g., <em>Hello</em>), but that code will be escaped and not interpreted as HTML (instead the < and > will be written out as if you had used HTML entities). The .innerHTML property, on the other hand, is “not safe”: any HTML included in the String you assign to it will be converted into DOM elements. This makes it not a great property to use unless unless you are absolutely certain the content came from a trusted source.
The
innerHTMLproperty should be used primarily for including inline elements such as<em>or<strong>. For more complex HTML content, it is cleaner code (separation of concerns!) to explicitly create new elements—see below for details.You can “clear” the content of an element by setting it’s content to be an empty string (
''):let alertElem = document.querySelector('.alert'); alertElem.textContent = ''; //no more alert!
Changing Attributes
You can also change the attributes of individual elements. Each attribute defined in the HTML specification is typically exposed as a property of the element object:
//get a reference to the `#picture` element
let imgElem = document.querySelector('#picture');

//access the attribute
console.log( imgElem.src ); //logs the source of the image

//modify the attribute
imgElem.src = 'my-picture.png';
You cannot access element.class or element.style attributes directly in this way; see below for specifics on changing the CSS of an element.
You can alternatively modify element attributes by using the methods getAttribute() (passing it which attribute to access) and setAttribute() (passing it which attribute to modify and what value to assign to that attribute):
let imgElem = document.querySelector('#picture');
imgElement.setAttribute('src', 'my-other-picture.png'); //set the src

console.log( imgElem.getAttribute('src') ); //=> 'my-other-picture.png'

//the `hasAttribute()` method returns a boolean.
let isThick = document.querySelector('svg rect')
                      .hasAttribute('stroke-width'); //chained anonymous variables
These methods will let you interact with attributes that are not defined by the HTML spec, such as data- attribute. However, they don’t work with certain element attributes (such as the value attribute of an <input> element). Other elements may have their own special DOM properties: see the DOM Documentation for a list of HTML interfaces.
Changing Element CSS
It is possible to modify the CSS classes (and even inline styling) of an element. But rather than using the class property like with other attributes, you instead access the classList property. On modern browsers (IE 10 or later), this property supports methods .add() and .remove() for adding and removing classes from the list:
//access list of classes
let classList = elem.classList;

//add a class
elem.classList.add('small'); //add a single class
elem.classList.add('alert','alert-warning'); //add multiples classes (not on IE)

//remove a class
elem.classList.remove('small');

//"toggle" (add if missing, remove if present)
elem.classList.toggle('small');
While IE 10+ does support these methods, it doesn’t support multiple arguments for them (so you can’t add multiple classes in a single method call). If you need to support older browsers (including any version of IE), you can instead modify the
.classNameproperty as if it were a String://fallback for IE (all) var classes = elem.className; classes += ' '+ 'sweet sour'; //modify the string (append!) elem.className = classes; //reassignThe
classListmethods work perfectly on Microsoft Edge.
It is also possible to access and modify individual CSS properties of elements through the DOM element’s style property. .style references an Object whose keys are the CSS property names (but written in camelCase instead of kabob-case)
let h1 = document.querySelector('h1');
h1.style.color = 'green';
h1.style.backgroundColor = 'black'; //not `.background-color`
In general, you should modify element CSS by changing the class of the element, rather than specific style properties.
Modifying the DOM Tree
In addition to modifying the individual DOM elements, it is also possible to access and modify the DOM tree itself! That is, you can create new elements and add them to the tree (read: webpage), remove elements from the tree, or pluck them out of the tree and insert them somewhere else!
First, note that each JavaScript DOM element has read-only properties referring to its parent, children, and sibling elements:
<main>
    <section id="first-section">
        <p>First paragraph</p>
        <p>Second paragraph</p>
    </section>
    <section id="second-section"></section>
<main>
//get reference to the first section
let firstSection = document.querySelector('#first-section');
//get reference to the "parent" node
let main = firstSection.parentElement;
console.log(main); //<main>...</main>
//get reference to the child elements (2 paragraphs)
let paragraphs = firstSection.children;
console.log(paragraphs.length); //2
console.log(paragraphs[0]); //<p>First paragraph</p>
//get reference to the the next sibling
let sectionSection = firstSection.nextElementSibling;
console.log(secondSection); //<section id="second-section"></section>Note that these properties only deal with HTML elements—text content nodes are ignored. You can instead use equivalent properties
parentNodeandchildNodesto also consider text content nodes.SVG content doesn’t support
parentElement, but does supportparentNode.
You can also call methods to create and add new HTML DOM elements to the tree. The document.createElement() function is used to create a new HTML element. However this element is not created as a part of the tree (after all, you haven’t specified where it would put into the page)! Thus you need to also use a method such as appendChild to add that new element as a child of another element:
//create a new <p> (not yet in the tree)
let newP = document.createElement('p');
newP.textContent = "I'm new!";

//create Node of textContent only (not an HTML element, just text)
let newText = document.createTextNode("I'm blank");

let main = document.querySelector('main');
main.appendChild(newP); //add element INSIDE (at end)
main.appendChild(newText); //add the text inside, AFTER the <p>

//add anonymous new node BEFORE element. Parameters are: (new, old)
main.insertBefore(document.createTextNode("First!"), newP);

//replace node. Parameters are: (new, old)
main.replaceChild(document.createTextNode('boo'), newText);

//remove node
main.removeChild(main.querySelector('p'));
The appendChild() method is considered a cleaner approach than just modifying the innerHTML property, as it allows you to adjust the DOM tree without erasing what was previously there. A common practice is to use document.createElement() to create a block element, then set the innerHTML of that element to its content (which can include inline elements), and then use appendChild to add the new block element to the tree at the desired location.
Accessibility
Whenever you learn a new technology, you should ask: how does this affect accessibility? With the JavaScript code modifying the rendered DOM, it is possible that the content of a page will change after it has been read by a screen reader. And while a sighted user will likely be able to see the change visually, a screen reader has no way of knowing that something on the page is different unless you tell it.
You can let screen readers know that an element in a page may have its content change in the future by making that element into an ARIA Live Region. Live regions are “watched” by assistive technologies, and whenever the content changes they will speak the new content to the reader as if it were being read for the first time.
You make an element into a live region by giving it the aria-live attribute:
<div aria-live="polite">
  This content can change!
</div>
The value assigned to the aria-live attribute is the “politeness level”, which specifies the priority by which the screen reader should read the change. The most common option (that you should almost always use) is "polite", which indicates that the changed text will be read only once the user has paused whatever is currently being read. A "polite" alert doesn’t interrupt the currently being read text or description, but instead will be injected when there is a break (if the current reading goes on for too long, then the new content will not be spoken).
- The other option is
"assertive", which indicates that the new content should be spoken as soon as it changes, possibly interrupting other content. This should only be used for important information (like alerts, warnings, or errors), as it can interrupt the user’s flow in ways that are very disorienting. In short: always be polite!
12.3 Listening for Events
In order to make a page interactive (that is, able to change in response to user actions), you need to be able to respond to user events. Whenever a user interacts with a computer, the operating system announces that interaction as an event—the event of a button being clicked, the event of the mouse being moved, the event of a keyboard key being pressed, etc. These events are broadcast to the entire system, allowing any application (including the browser) to “respond” the occurrence of the event, such as by executing a particular JavaScript function.
Thus in order to respond to user actions (and the events those actions generate), we need to define a function that will be executed when the event occurs. You will define a function as normal, but the function will not get called by you as a particular step in your script. Instead, the function you specify will be executed by the system when an event occurs, which will be at some indeterminate time in the future. This process is known as event-driven programming. It is also an example of asynchronous programming: in which statements are not executed in a single order one after another (“synchronously”), but may occur “out of order” or even at the same time! (For more about working with asynchronous programming, see Chapter 14).
In order for your script to respond to user events, you need to register an event listener. This is a bit like following someone on social media: you specify that you want to “listen” for updates from that person, as well as what you want to do when you “hear” some news from that person.
- Specifying that you want Slack to notify you when your name is mentioned is another good analogy!
The DOM API allows you to register an event listener by call the .addEventListener() on a selected element (e.g., on the element that you want to listen to). This method takes two arguments: a string representing what kind of event you want to listen for, and a callback function to execute when you hear that event:
//a (named) callback function
function onClickCallback() {
    console.log("You clicked me!");
}

//get a reference to the element we want to "listen" to
let button = document.querySelector('button');

//register a listener for 'click' events
button.addEventListener('click', onClickCallback);
When the button is clicked by the user, it will “shout” out a
'click'event (“I was clicked! I was clicked!”). Because you have set up a listener (an alert/notification) for such an occurrence, your script will be able to do something—and that something that it will do is run the specified callback function.It’s like you handed someone a recipe and told them “when I call you, bake this cake!”
It is much more common to use an anonymous function as the callback:
let button = document.querySelect.select('button');
button.addEventListener('click', function() {
    console.log("You clicked me!");
});
Note that this listener only applies to that particular button—if you wanted to respond to a different button, you’d need to register a separate listener! Also, as the method name implies, it is possible to add multiple listeners (callbacks) to the same element for the same event: all of them will be executed “at once”.
The event callback will be passed in a single argument: an object representing the “event” that occurred. (Since all parameters are optional in JavaScript, and it wasn’t used in the above example, it wasn’t included in the callback definition). This event includes information such as where the event occurred (in x,y coordinates), what DOM element caused the event, and more:
elem.addEventListener('click', function(event) {
   //get who was clicked;
   let clickedElem = event.target; //target property of the event
   console.log(clickedElem);
});
Also note that sometimes you want to stop the “normal” results of an event from occurring. For example, perhaps you don’t want a button to do it’s normal button thing (such as submitting a form), and instead want to provide your own custom behavior. To support this, you can “interrupt the event” by calling the following methods on the event:
submitBtn.addEventListener('click', function(event) {

  event.preventDefault(); //don't do normal behavior
  event.stopPropagation(); //don't pass the event to parents

  //..do custom behavior here

  return false; //don't do normal behavior OR propagate! (for IE)
})
Types of Events
There are numerous different events that you can listen for, including:
Mouse Events such as
'click'. Theevent.offsetXandevent.offsetYwill provide (x,y) coordinates for the clicks location relative to the target element; you can useclientX/Yfor coordinates relative to the browser window, orpageX/Yfor coordinates relative to the document (regardless of scrolling). See this post for details, and this page for an example.Other mouse events include
'dblclick'(double-click),'mousedown'(mouse button is pressed down, may be held),'hover'(mouse hover),'mouseenter'(mouse moves over element),'mousemove'(mouse moves over element), and'mouseleave'(mouse moves of of element).Keyboard Events such as
'keydown'. Theevent.keyproperty is used to determine which key was pressed, giving a predefined key value you can check:elem.addEventListener('keydown', function(event){ if(event.key === 'ArrowUp'){ console.log("Going up!") } //... });The
eventobject also has properties to check if any “modifier keys” such as shift, control, or meta (Windows/command) are held when the event occurs.Note that you almost always want to respond to the
'keydown'and'keyup'events; the'keypressed'event is sent later and only applies to non-modifier keys.Window Events are event created by the
windowglobal, which we are also able to register event listeners on! For example, the'resize'event can be used to identify when the window has changed size (e.g., if you want to make the content responsive as well as the CSS):window.addEventListener("resize", function() { //... });(See the documentation for advise on using this callback)
Additionally, the
windowglobal defines a special event callback that occurs when the web page has finished loading. You can assign your own function to this callback to run code only after the webpage has loaded (e.g., for scripts specified in the<head>):window.onload = function() { //...do stuff once page is ready (e.g., run the rest of your code) }
Style guideline: always register event listeners in the JavaScript—do not utilize the HTML attributes such as onclick. This is to help keep concerns separated: the HTML should not need to know anything about the JavaScript that is utilized (since the browser may not even support JavaScript!), but it’s okay for the JavaScript to rely on and modify the HTML.
Event-Driven Programming
In a typical web program event callback functions can occur repeatedly, over and over again (e.g., every time the user clicks a button). This makes them potentially act a bit like the body of a while loop. However, because these callbacks are functions, any variables defined within them are scoped to that function, and will not be available on subsequent executions. Thus if you want to keep track of some additional information (e.g., how many times the button was clicked), you will need to use a variable declared outside of the function (e.g., a global ). Such variables can be used to represent the state (situation) of the program, which can then be used to determine what behavior to perform when an event occurs, following the below pattern:
//pseudocode
WHEN an event occurs {
   check the STATE of the program;
   DECIDE what to do based on that state;
   UPDATE the state as necessary for the next event;
}
For example:
let clickCount = 0;  //keep track of the "state" (global)
document.querySelector('button').addEventListener('click', function() {
    if(clickCount > 10) {  //decide what to do
        console.log("I think you've had enough");
    }
    else {
        clickCount++;  //change state (+1)
        console.log('You clicked me!');
    }
});- These “state” variables can be global, or can simply be declared within a containing function as a closure. State variables are often objects, with individual values stored as the properties. This provides a name-spacing feature, and helps to keep the code from being cluttered with many variables.