B Testing with Jest
People just aren’t as repeatable as computers are. Nor should we expect them to be. A shell script or batch file will execute the same instructions, in the same order, time after time. It can be put under source control, so you can examine changes to the procedure over time as well (“but it used to work…”). - The Pragmatic Programmer
This chapter introduces automated testing using the Jest framework. By following this tutorial, you will learn how to write and execute simple unit tests on JavaScript functions and DOM manipulating code.
This tutorial references code found at https://github.com/info343/jest-tutorial.
B.1 Testing
One of the most important goals when developing computer programs is to make sure that the code you write actually works. You can determine if a program works by considering three things:
What input was given to the program? From a user perspective, this is what actions that user took (e.g., “I pressed a button”). From a code perspective, this is often what value was passed to a method.
Running the program with a particular input will lead to a received result: something will happen because of the input. From a user perspective, this would be this would be like the changes to a web page caused by the button press. From a code perspective, this could be the value returned by that function (or potentially a new value for a state variable).
To know if a program worked though, you need to know the expected result of that program: what was supposed to happen because of the input? If you don’t know what the program was supposed to do, then you’ll have no way of knowing if it worked or not!
You can test a program by providing the input and then comparing the received result. If the received result matches the expected result, then you know that the program worked! Testing is simply the process of providing the inputs and comparing the received and expected results
Providing the input and then comparing the received and expected results can get tedious, particularly if you have lots of possible inputs or they require multiple steps (like clicking on multiple buttons). For that reason, it’s helpful to use automation to let a computer perform the testing for you. You define the expected result of some action, and the computer will check if the received result matches.
Because automated testing is so useful and comment, there are a wide variety of testing frameworks: external scripts that provide the code to let you easily compare received and expected results.
In JavaScript, the most popular testing frameworks are Jasmine, Mocha (which is just the framework, it uses Chai to actually compare received and expected results—hot beverages are a theme), and Jest. The later was developed by Facebook specifically to support testing React applications, and is the framework introduced and used in this course (though its API is almost identical to Jasmine and Mocha/Chai).
B.2 Testing with Jest
Jest is a command line program so you will need to have it installed on your machine. It can be installed globally through npm:
npm install -g jestAdditionally, you will need to install the dependencies listed in this repository’s package.json file, which will allow tests to use ES6 module syntax to access the functions in a separate file to test (as well as auto-complete definitions for Jest!)
# install all dependencies
npm install
With Jest, you define “tests”, which are just JavaScript code that is used to perform the action and compare the received and expected results. These tests can either be placed in a file whose name ends with .test.js (indicating it is a test script), .spec.js (for “specification”), or a plain .js file inside the __tests__ folder in your program. In either case, a test script is just a JavaScript file, so you include any JavaScript code/variables/functions/etc. you want.
B.3 Writing a Test
We define a “test” (a check if a particular piece of functionality works) by calling the test() function—a predefined function provided by the Jest framework. This functions take two arguments: a string describing what the test is checking, and a callback function that will contain the code to run which does the action and compares the results.
test('should do something...', function() {
  //regular old Javascript code that will perform the test goes here
});
Test descriptions (the string parameter) are written in present tense, and state in plain English what behavior SHOULD happen. Starting the description with the word “should” is a good approach!
Jest also provides a function
it()that is an alias fortest(), and lets the code read like badly punctuated English:it('should do something', function() { ... });
Assertions and Matchers
We check that the program actually does what we’re testing by writing an assertion. An assertion is a proposition that some fact is true. In this case, we are going to assert that the expected result and the actual result are the same. If that proposition is shown to be valid (our claim that the results matched is true), then we know that our claim that the program works must hold and thus we “pass” the test!
You can think of an assertion as a bit like doing the work of an if-else statement:
if(received value == expected value){
    test passes
} else {
    test fails
}
In Jest, we put forth an assertion by calling the expect() function with an appropriate matcher. The expect() function takes a single parameter, which is the received result (produced by doing the action; e.g., calling the function with a particular input). A matcher is another function that is called directly on the returned value of expect(), and takes as an argument the expected result that we want to compare. The matcher does the work of actually comparing the values, and then reporting the validity of our claim back to Jest:
test('should add numbers correctly', function() {
  expect(1+1).toEqual(2);
});
In this case,
.toEqual()is the “matcher” which compare the received and expected values to see if they are equal.Be careful about your parentheses! The
expect()function should take a single expression (even if that expression includes a function call), and the matcher is called after theexpect()function. Using local variables can help with readability.
Jest supports a wide variety of matchers. For example:
//can do numerical comparison
expect(receivedNumber).toBeGreaterThan(expectedNumber);

//compare against undefined
expect(receivedValue).toBeDefined(); //check if defined!

//find receivedValue in an array
expect(receivedArray).toContain(expectedValue);

//can negate ANY matcher with a .not property
expect(receivedValue).not.toEqual(expectedValue);- See the documentation for a complete list.
Note that a single test() can include multiple assertions!
Organizing Tests
You can “group” tests together by using the describe() function. This function takes two parameters: a string that describes what feature is being tested, and a callback function that contains the code for the tests:
describe('Basic math', function() {
  it('should add numbers correctly', function() {
    expect(1+1).toEqual(2);
  });
});
You should name your feature and test features so that they read as:
{Feature name} should {do something specific}
This will allow the test results to be communicated very clearly, even to non-developers (e.g., to your boss or client).
describe()blocks can contain multipletests(), and even otherdescribe()blocks if you want to separate subfeatures.
It is also possible to run particular blocks of code before groups of tests are run by using the beforeEach() and beforeAll() functions. See Setup and Teardown for details.
Running the Tests
You can run the test (have the computer perform the testing work) by using the jest command line program, passing it the name of the text script (without the extension) that you wish to run:
# test the app.spec.js file
jest app
The command line will print out the results of this test script:
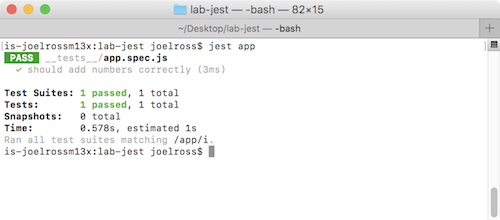
An example passing script
This will tell you what tests were run, which “passed” (were green for good to go!) and which “failed” (were red). Failed tests will also report which assertion failed, and what the expected and received values were that didn’t match.
Practice
This repo’s app.js file contains a function invertCase(). In the provides app.spec.js file, implement a describe() block to contains tests for the function, and write unit tests to check it for bugs (by giving it specific inputs and checking the received vs. the expected result). If you find any bugs, fix them and then re-run your tests!
B.4 Testing Web Apps with Jest
It is also possible to use Jest to JavaScript code that is used to manipulate the DOM. You can do this because Jest creates a virtual DOM that you can interact with. That is, jest provides a global document object that you can access and call methods on (e.g., document.querySelector()). This isn’t a full browser: it won’t load external CSS files or allow you to navigate to pages, but it does provide a tree of HTML elements you can modify and inspect. allowing you to test your DOM manipulation.
There are a few steps to being able to work effectively with the document provided by Jest:
First, you will want to make sure the content of the DOM includes the HTML elements you wish to test with. This is called mounting the content. You can mount some HTML content by assigning it to the
innerHTMLof the DOM’s root element—not the<html>element, but a virtual element that acts as the ultimate parent of the DOM (similar to the root/folder on an operating system). This node can be accessed via thedocument.documentElementproperty://assign a given HTML content (e.g., as string) to the virtual DOM document.documentElement.innerHTML = "<html><head></head><body>...</body></html>";Often, this HTML content is read directly from the file, using Node’s
fs(file system) library.Because the
documentobject only represents the DOM tree (the rendered HTML), it won’t apply any embedded<script>tags. So in order to run your script on the DOM and modify it, you will need to manually apply those scripts. But since Jest has already defined you adocumentobject to modify, you can simply tell Jest to load and run your script! Your code will do the exact same thing it does in the browser, just querying and modifying Jest’s virtual DOM (document) rather than the browser’s DOM.You load an external script in Jest by using Node’s
require()function, passing it the relative path to the script file you wish to load (this script must be saved locally)://load the `index.js` file require('../js/index.js');Note that this path is relative to the location of the test script, not relative to the location of the
.htmlfile (since Jest doesn’t use the HTML). If the script file is in the same directory as the spec file, you will need to put a./in front of the filename path to indicate that you’re giving a path rather than naming a module.You will need to also explicitly have Jest load any external libraries (such as jQuery) you wish to use. These libraries will need to be loaded from a local file (Jest can’t access a CDN), but they can usually be installed via
npm. For example, you would load jQuery with:$ = require('jquery'); //load the jQuery module (installed from npm) window.$ = $; //assign make the jQuery library into a DOM globalRemember to load any external scripts before your own!
Finally, you can use DOM methods (or jQuery helpers!) to trigger events (like button clicks). You can then inspect the DOM with
document.querySelector()and run assertions about the state of DOM after that user action.//for example let h1 = document.querySelector('h1'); expert(h1.textContent).toEqual('Hello world!');
And with that, you can automatically test if your page’s interactivity works as expected without needing to repeatedly click on a button. In particular, these automatic tests can help you make sure that future changes don’t break your code (e.g., don’t cause the tests to fail), performing what is called regression testing.
- You should still test your page inside the browser, just to catch any platform differences between Jest’s virtual DOM and actual web browsers.
Practice
Write a test in the provided index.spec.js file to confirm that when the “Panic” button is pressed, the HTML’s .alert element is displayed.